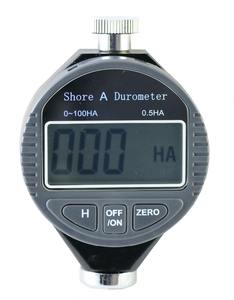
1.Overview:
Shore Hardness Tester is an apparatus to measure vulcanized rubber and plastic products.
This apparatus has three models of LXA, LX-C and
LX-D.
LX-A and LX-D respectively are applicable to the testing of low and medium hardness, and high-hardness materials.
LX-C applies to the testing of microporous material which is used to make shoes, with compression rate 50 percent, stress 0.049 MPa or above, and this kind of material is made of rubber plastic and has blister in plastic.
This hardness gauge conforms to the regulations of GB/T531, GB2411, HG/T2489, JB6148.
2.Main Technical Parameters:
| Model | LX-A | LX-C | LX-D |
| Measuring Range | 0-100° | ||
| Measuring Error | Within 20-90°,the error is ≦±1° | ||
| Resolution | 0.1° | ||
| Pressure Needle Range | 0-2.5mm | ||
| End Pressure Of Pressure Head | Type A and C: 0.55N-8.05N Type D: 0-44.5N | ||
3.Using Methods:
When using sample, one should place the sample in the solid plane, hold the hardness gauge, keep
the pressure needle at a distance of at least 12 mm from the edge of the sample, smooth enough
pressure in the pressure on the sample, and smoothly press on the sample to a full extent. until
pressed to a full extent and contact the sample completely, then read the calibration value within
one second.
At measuring points which are at least 6 mm away from each other, measure hardness values for
five times, and calculate the average value (for microporous material, the distance between the
measuring points should be at least 15 mm).
In order to keep the stability of conditions and improve the accuracy of determination, one should
install the hardness gauge on the same type of the measuring shelf from a complete production
network.
4.Using Instructions:
4.1.Before using,please check the hardness tester should be display “00.0” in free state(if don’t
display,you can press “ZERO” button).Place the hardness gauge on glass plate, and the pointer
should direct at a 100±1 degree angle (the end of pressure needle and the bottom surface of
pressure foot should be closely in contact with the glass surface) If the pointer doesn’t point to
the zero position, it cannot be used, either.It’s better to send it back to the factory for adjustment.
4.2.Type D hardness tester on reference plane to check the zero position,Under the heavy load,the
hard pressure head is easy to pressed reference plane,so must be put on standard gauge block on
the reference plane,when operating with hardness tester,the indenter alignment gage block
center hole,then pressed hardness tester,when the indenter foot completely stitching with
standard gauge block and reference plane,the hardness tester should be display 10±1HD(Gauge
block thickness 2.25 ± 0.0003mm is equal to hardness tester into 10HD pressure depth), if can’t
display accurately,the hardness tester also cannot use.
4.3.Rubber sample shall be prepared according to the requirements of GB/T531;plastic sample shall
be prepared according to the requirements of GB2411;Rubber microporous materials sample
shall be prepared according to the requirements of HG/T2489.
4.4.Before the test,rubber sample shall be prepared according to the requirements of GB/T2941,
GB/T2918 in the laboratory standard temperature to test.
4.5.When measuring the sample, A-type hardness gauge’s value is more than 90 degrees, it is
recommended that one should use D-type hardness gauge. When using D-type hardness gauge,
the value is below 20 degrees, it is recommended that one should use A-type hardness gauge.
When A-type hardness gauge’s value is 10 degrees, it is not accurate, and the measurement
result can not be used.
4.6.After complete using the hardness gauge, it should be wiped clean and put into the device box,
and stored in dry place to prevent damp. The measurement shelf should be wiped frequently and
be coated with a little anti-rust oil to prevent it from rusting, moreover add No. 20 oil to the
flexible parts.


